Products
Nagios Log Server - Using The Custom Includes Page
Overview
This KB article shows you how to use the Custom Includes page in Nagios Log Server (available in NLS 2.1.0 onwards).
The Custom Includes component allows you to upload your own custom Cascading Style Sheets (CSS), JavaScripts and Images to add customizations to Nagios Log Server. This allows you to customize NLS without the changes being overwritten by future upgrades.
This KB article will show you how to change the color of the header with examples of a solid colour, a gradient and an image.
HTML / CSS / JavaScript skills are required for advanced customizations, this guide is an example of what can be achieved.
This KB article uses Firefox as the web browser, certain steps may vary if you are using a different web browser.
Identify The Object Being Changed
First we need to know the object being changed. We are going to change the background color of the Navigation bar in Nagios Log Server so we need to identify the HTML object that needs to be changed.
Right click on the top Navigation bar and select Inspect Element (Q)

This will display an additional window at the bottom of the web browser with the object that you just selected to inspect. In the following screenshot you can see the object has been highlighted.
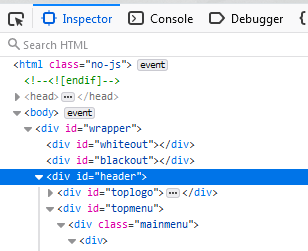
Specifically this piece of information is what we are after:
<div id="header">
The object is a DIV, which is referenced in CSS styling using a # symbol
The name of the object is header
You can close the Inspect Element window by clicking the cross at the top right corner of it.
Create CSS File
Now you need to create a custom CSS file that has the custom color defined in it.
On your workstation, in a text editor create a file called Header-Solid.css with the following content:
    #header {
        background: rgba(191,220,248,1);
    }
Upload CSS File
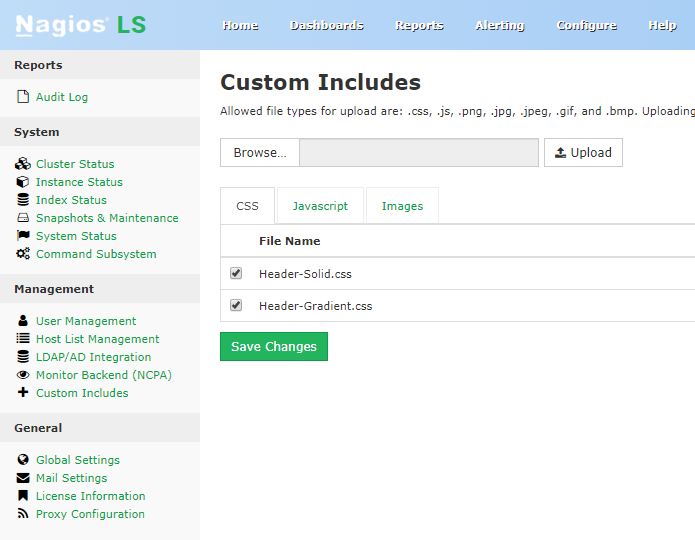
In Nagios Log Server Navigate to Admin > Management > Custom Includes
Click the Browse button, navigate to the file Header-Solid.css and then click the Upload button.
You will receive a message saying it "Successfully uploaded file".
Uploaded files are enabled by default. If you would like to disable them, uncheck the checkbox to the left of the file's name.
After clicking the Save Changes button the header background color should change the next time the header is refreshed (click the Admin menu item), you may need to press CTRL + F5 to force a refresh. If you followed this example it will look like:

Gradient
Here's a different example that uses CSS techniques to use a color gradient instead of a solid color. If you search the internet for "CSS Gradient" you'll find some free online tools that will provide you with the CSS code.
On your workstation, in a text editor create a file called **Header-Gradient.css **with the following content:
    #header {
        background: rgba(191,220,248,1);
        background: -moz-linear-gradient(left, rgba(191,220,248,1) 0%, rgba(132,183,241,1) 100%);
        background: -webkit-gradient(left top, right top, color-stop(0%, rgba(191,220,248,1)), color-stop(100%, rgba(132,183,241,1)));
        background: -webkit-linear-gradient(left, rgba(191,220,248,1) 0%, rgba(132,183,241,1) 100%);
        background: -o-linear-gradient(left, rgba(191,220,248,1) 0%, rgba(132,183,241,1) 100%);
        background: -ms-linear-gradient(left, rgba(191,220,248,1) 0%, rgba(132,183,241,1) 100%);
        background: linear-gradient(to right, rgba(191,220,248,1) 0%, rgba(132,183,241,1) 100%);
        filter: progid:DXImageTransform.Microsoft.gradient( startColorstr='#bfdcf8', endColorstr='#84b7f1', GradientType=1 );
    }
Upload Header-Gradient.css using the same method as before. Make sure Header-Gradient.css file shows below Header-Solid.css so that it overwrites any conflicting properties. The result should be something like:
You can see that the navigation bar is getting darker as it progresses from left to right.
Images
Using images is also possible. Here's an example image called background.png I am going to use for the header example:

First you must upload the image.
In Nagios Log Server Navigate to Admin > Management > Custom Includes
Click the Browse button, navigate to the file background.png and then click the Upload button.
You will receive a message saying it "Successfully uploaded file".
Now you need to create a CSS file. On your workstation, in a text editor create a file called **Header-Image.css **with the following content:
    #header {
        background-image: url("../images/background.png");
    }
It's important to mention that the image files are stored in a directory called images and the css files are stored in a directory called css. Because the CSS code is being accessed from within the css directory we need to use a relative reference to the images folder using the syntax ../images/ as per the code example above.
Upload Header-Image.css using the same method as before. Make sure that Header-Image.css is placed below the existing Header-Solid.css or Header-Gradient.css files in the Custom Includes component. The result should be something like:
Final Thoughts
For any support related questions please visit the Nagios Support Forums at: